
(Real) Food Photography 101
- Piranha Music
- Dec 4, 2021
- 3 min read


There is a misconception amongst many people that most dishes you see in ads or menu photographs are not actually real food. While certain brands do use plastic buns or glue-cheese instead of the real thing, it is by no means necessary. Using props instead of real food does have certain benefits but considerably raises the budget and also requires an additional arts & crafts department on set. For local restaurants or home DIY shoots, using your real dishes is totally legit and can produce some striking photographs if done properly.
Here's a little step-by-step guide as to how to get the perfect shots for your dishes.
STEP 1 - ORGANISATION
Organisation is key to any successful photo or vide shoot and it all starts here. Make sure you have a list of items ready in correct order as you would shoot them. Try to bunch your items in ways where you could prepare them in batches that would be most time-efficient. Get all the ingredients you need together - groceries, plating, decoration etc. Make sure you have some masking tape, clamps and clips handy.
Finally make a list of all the shots you need and a timeline for them. Always leave spaces for food breaks and setup times.Your setup time will vary depending on how elaborate the decoration & lighting is. For shot time, around 15-20 minutes per dish is reasonable estimate.
STEP 2 - THE FOOD
Trust your eyes here. If it looks good to you, chances are it will look good on camera. If you have a dedicated chef, sometimes you could ask him to do the presentation as well.
Following step 1 and being organised will make sure you can shoot your food fresh from the kitchen, when it looks it's best. You don't want to cook all your food and then shoot, most dishes lose their initial spark when stored for long.
STEP 3 - LIGHTING & CAMERA
If you are looking to start a kitchen from your home and you cant afford a professional photographer, sometimes a mobile phone may be your only option. Don't be disappointed though, you work with what you have and there is no reason why a simple phone camera can't get you useable pictures.
Make sure your food is well lit. Use extra lights to fill out the shadows. We used a couple of Elinchromes to light up these burgers but if you are looking to do this on a budget, a simple ring light or a nice open window with some warm sunlight can be your best friend.

STEP 4 - SHOOTING
Having a DSLR and prime lens is ideal. For most uses 50-60mm lenses are perfect. If you are shooting a wider spread, such as a platter or extra large pizza you might want to go wider with a 35mm lens.
If you are using a phone, make sure your food is well illuminated and try to avoid using your own camera torch for this.

Using coloured chart papers is a good budget strategy to give your food nice solid backgrounds. You can choose your colours depending on the food but Red/Green/Yellow are good choices to start with. Else you could also use any surface which has a nice pattern - here we used old jute bags for a rustic feel.
STEP 5 - EDITING
Adobe Lightroom & Photoshop are the best choices for editing your photos. Wether you want to get creative with the colours or do some minor touch ups, a little bit of editing goes a long way.
Lightroom has a wonderful mobile version as well with some great free features. Snapseed is another good option to edit your photos.
There you go! Follow these steps and get some delicious pictures of your food. Wether you are a blogger, critic or have your own restaurant/cloud kitchen I hope this guide helps you click some great pics.


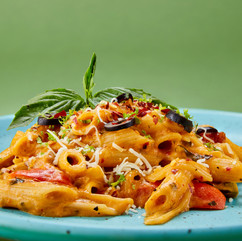


Sample pics are from our shoot for Harlem Kitchen by WFD (www.wfd.co.in)
Please reach out to us and tag us @piranhapictures on Instagram with your own photos!


Comments